Overview
Invoices are how you bill your clients in Beeswax. Each invoice belongs to a project and is allocated to a client business. Invoices track money owed to you — the amounts your clients need to pay for work completed.
Every invoice has a unique sequential number generated automatically by the system. You can customise the number if needed.
Invoices follow a workflow from creation through to payment:
- Create the invoice and add line items
- Finalise to lock it for sending
- Send the PDF to your client via email or mark as sent
- Track payments until the invoice is fully paid
Invoices can also be created from templates, duplicated from existing invoices, generated from completed time entries, or converted from approved quotes.
Creating an Invoice
Click New Invoice from within a project to open the invoice creation form.
Fields
| Field | Required | Description |
|---|---|---|
| Title | Yes | A short description of what the invoice is for |
| Date | Yes | The invoice date (defaults to today) |
| Company | Yes | The client business this invoice is for. Start typing to autocomplete from your existing businesses. |
| Project | Yes | The project this invoice belongs to |
| Number | Yes | Auto-generated sequential number. Can be edited. |
| Content | No | Additional description or notes visible on the invoice |
| Footer | No | Footer text displayed at the bottom of the PDF |
| Tax Inclusive | No | Toggle whether line item amounts include tax or are tax-exclusive |
| Default Transaction Account | No | The default income account applied to new line items |
| Default Tax | No | The default tax rate applied to new line items |
Creation Options
- From Time Entries — When creating a new invoice, you can import completed time entries from the project as line items
- From Template — Select a saved template to pre-populate the invoice with predefined line items and settings
- From Quote — Approved quotes can be converted to invoices (see Converting from Quote)
Line Items & Transaction Groups
Invoices use a two-level structure for line items: Transaction Groups contain one or more Transactions (individual line items).
Transaction Groups
A transaction group is a section heading that organises related line items. For example, you might have groups called "Design Services", "Development", and "Hosting".
- Each group has a name and a position (display order)
- Groups can be reordered via drag-and-drop
- Each group shows a subtotal of its line items
Individual Line Items (Transactions)
Each line item within a group has:
| Field | Description |
|---|---|
| Description | What the line item is for |
| Quantity | Number of units (defaults to 1) |
| Amount | Unit price |
| Tax | Tax rate to apply (selected from your configured tax rates) |
| Account | The income account category for this line item |
Tax Calculation
Beeswax supports two tax modes:
- Tax Exclusive — Line item amounts do not include tax. Tax is calculated on top and added to the total.
- Tax Inclusive — Line item amounts already include tax. Tax is calculated as a portion of the amount.
Toggle the Tax Inclusive checkbox on the invoice to switch modes. This affects all line items.
System Transactions
When an invoice is saved, the system automatically creates accounting entries:
- Trade Debtors — An asset entry recording the amount owed to you
- Tax Collected — A liability entry for tax collected on the invoice
These system transactions are hidden from the invoice display but appear in your accounting ledger.
Invoice States & Workflow
Invoices move through a series of states as they progress from creation to payment.
| State | Description |
|---|---|
| Draft | New invoice. Fully editable. Not yet in the accounting ledger. |
| Finalised | Assigned an invoice number and entered into the accounting ledger. Sending and payment options become available. |
| PDF Sent | PDF has been emailed to the client. |
| Marked Sent | Manually marked as sent (without emailing). |
| First Notice | First payment reminder has been sent. |
| Second Notice | Second payment reminder has been sent. |
| Final Notice | Final payment reminder has been sent. |
| Partial Paid | One or more payments received, but balance remains. |
| Paid | Fully paid. Invoice is complete. |
Key Rules
- Line items become non-editable once a payment has been recorded (Partial Paid or Paid state)
- Admin users cannot change the transaction account or tax on line items — these are set by the transaction template and can only be modified by Owner, Super Admin, or Accountant roles
- Payment states (Partial Paid, Paid) are automatically set when payments are recorded
- The notice states (First, Second, Final) are set when you send follow-up emails
Finalising an Invoice
Finalising locks an invoice and prepares it for sending and payment.
What Happens When You Finalise
- The invoice is assigned a sequential invoice number (if not already set)
- The invoice date is set (defaults to today if not provided)
- The invoice enters your accounting ledger (system transactions for Trade Debtors and Tax Collected are created)
- Sending and payment options become available
Requirements
- The invoice total must be zero or positive (non-negative)
- The project must not be locked
- The invoice must be in Draft state
Sending & Emailing
Once finalised, you can send the invoice PDF to your client.
Email PDF
- Click the Send menu and select Email PDF
- Enter recipient email addresses (TO field)
- Optionally add CC recipients
- Write a custom message to include in the email
- Preview the PDF before sending
- Click Send
The system attaches the invoice PDF and delivers it to all recipients. Unknown email addresses are automatically added as contacts in your account.
Mark as Sent
If you deliver the invoice outside of Beeswax (e.g. printed or sent via another tool), you can manually mark it as sent:
- Click Mark as Sent from the Send menu
- This updates the state without sending an email
- You can remove the sent status later if needed
Payment Reminder Notices
Invoices support First Notice, Second Notice, and Final Notice states for tracking payment follow-ups:
- First Notice — First payment reminder
- Second Notice — Second reminder
- Final Notice — Final demand for payment
Re-sending the PDF from a notice state advances the invoice to the next notice level.
PDF Layout Options
When downloading or emailing the PDF, you can choose from several layouts:
| Layout | Description |
|---|---|
| Everything | Full detail — all line items, quantities, amounts, and tax |
| No Line Item Details | Hides individual transaction descriptions |
| No Line Qty or Amounts | Shows line items but hides quantity and unit price columns |
| Total with Details | Shows the total with supporting detail |
| Total without Details | Shows only the invoice total |
Payments & Remittances
Payments against invoices are tracked through remittances.
Recording a Payment
Each payment (remittance) records:
| Field | Required | Description |
|---|---|---|
| Amount | Yes | The payment amount |
| Date | Yes | When the payment was received |
| Bank Account | Yes | Which bank account received the payment |
How Payments Work
- When you record a payment, the system creates an IncomePayment journal entry for accounting
- The invoice's payable amount decreases by the payment amount
- The invoice's paid amount increases accordingly
Payment States
- If the payment equals the remaining balance → invoice moves to Paid
- If the payment is less than the remaining balance → invoice moves to Partial Paid
- If a payment is deleted and no payments remain → invoice reverts to Finalised
Important Notes
- You cannot delete an invoice that has payments recorded against it
- Payments can be linked to bank statement line items for reconciliation
- Admin-level users cannot approve payments — only Owner, Super Admin, and Accountant can
Recurring Invoices
Recurring invoices allow you to automatically generate invoices on a monthly schedule.
Setting Up a Recurring Invoice
- Create and finalise the template invoice with your standard line items
- Click Schedule from the invoice menu
- Configure the recurring settings:
| Setting | Description |
|---|---|
| Start Date | When to begin generating invoices |
| End Date | When to stop (leave empty for indefinite) |
| Recipients | Select contacts to receive the auto-generated invoice via email |
How It Works
- The system generates a new invoice on the same day each month (based on the template invoice's date)
- The generated invoice title includes the billing period (e.g. "Invoice [13 Jan - 12 Feb 2026]" or "Invoice [Feb 2026]")
- Each generated invoice is automatically finalised
- If recipients are configured, the PDF is emailed automatically
- Generated invoices are flagged as auto-generated and linked back to the source template
Month Boundary Handling
If the template invoice date is the 29th, 30th, or 31st, the system adjusts for shorter months (e.g. February uses the 28th).
Managing Recurring Invoices
- You can view all active recurring invoices from the Recurring Invoices page
- Edit the start/end dates or recipients at any time
- Deactivate a recurring invoice to stop future generation
- The system automatically deactivates when the end date is reached and sends a notification
Important Notes
- Recurring invoices are monthly only — no weekly or quarterly option
- Only available for invoices (not expenses or quotes)
- Admin role users cannot manage recurring invoices — only Owner, Super Admin, and Accountant can
Templates & Duplication
Save as Template
Any invoice can be saved as a template for reuse:
- Click the invoice menu and select Save as Template
- The invoice is copied to your account's template library
- Templates preserve line items, tax settings, and account defaults
Import from Template
When creating a new invoice:
- Select a template from the template dropdown
- The new invoice is pre-populated with the template's line items and settings
- You can then modify any fields before saving
Duplicate
To create a copy of an existing invoice:
- Click the invoice menu and select Duplicate
- A new draft invoice is created with all the same details
- The duplicate gets a new sequential number and today's date
Converting from Quote
Quotes can be converted into invoices.
How to Convert
- Open the quote
- Click Make Invoice from the quote menu
- Confirm the conversion
What Happens
- A new invoice is created as a deep copy of the quote
- All transaction groups and line items are copied
- The company, project, and content are preserved
- The new invoice gets a fresh invoice number and today's date
- The invoice starts in Draft state
- The original quote remains unchanged
Important Notes
- Quotes can be converted from any state — finalisation is not required
- You can convert the same quote to an invoice multiple times
- Each conversion creates a separate, independent invoice
- An activity log entry records the conversion
Import & Export
Importing Invoices
You can bulk-import invoices from a CSV file:
- Click Import from the invoices list
- Upload a CSV file
- The system recognises "Sale Order" and "Tax Invoice" rows as invoices
- Imported invoices include the invoice number, line items, and amounts
PDF Export
Download any finalised invoice as a PDF:
- Click the Download menu on the invoice
- Select a layout option (Everything, No Details, Total Only, etc.)
- The PDF is generated and downloaded
Xero Integration
If your account is connected to Xero:
- Invoices can be synced to Xero automatically
- The system tracks sync status and prevents duplicate syncing
- Payment updates from Xero webhooks are detected to avoid sync loops
How-to Guides
Create an Invoice
- Navigate to the desired Project
- In the Money section, select Invoices
- Click New Invoice
- Add line items or groups
- Add Line Items under each group
Note: Groups enhance readability and enable Milestone creation.
Edit an Invoice
- Open the invoice by clicking its ID or pencil icon
- Click fields to modify — changes save automatically
- Toggle Show Details for line item editing
- Preview and send as PDF
Delete an Invoice
- Locate the Invoice
- Click the Delete icon in page actions
- Confirm deletion
Note: Invoices with payments applied cannot be deleted. Remove the payment first (you may need to unreconcile the payment before removing it).
Preview an Invoice
- Find the invoice
- From Page Tools, click the Eye icon
- Choose a display option: Everything, No Line Item Amounts, No Line Item Details, or Total Only
Schedule an Invoice
- Open an existing Invoice or create a new one
- Click the calendar icon in Page Tools
- Set scheduling preferences and save
Note: The stop-after date is a future cutoff. The scheduled range displays in the invoice title.
Duplicate an Invoice
- Locate the Invoice (via Global Search, Money Search, or Project)
- Click the Duplicate icon in page actions
Create an Invoice from a Quote
- Navigate to the Project with the Quote
- Click the Duplicate icon in Page Actions
- The system transfers all Quote information into a new Invoice (Draft status)
- Make adjustments and finalise
Apply a Payment
- In Who Owes Me, select the invoice checkbox
- Click Apply Payment — the full amount auto-populates (adjust for partial payments)
- Click Save
Invoice Creation Methods
Invoices can be created in several ways:
- Manual — Create from scratch within a project
- From Closed Tasks — Import completed time entries as line items
- From Template — Use a saved template to pre-populate line items
- Duplicated — Clone an existing invoice
- From Quote — Convert an approved quote into an invoice
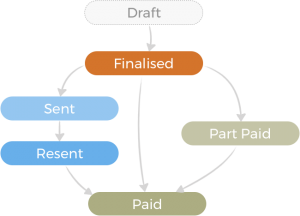
Invoice States
| State | Description |
|---|---|
| Draft | Editable, not yet in the accounting ledger |
| Finalised | Gets an invoice ID, payment is allowed, enters the accrual ledger |
| Sent | Activity recorded when emailed to client |
| Resent | Used when re-sending the invoice |
| Part Paid | One or more payments received, balance remains |
| Paid | Fully paid, invoice is complete |
Permissions by Role
Different roles have different levels of access to invoice features.
| Action | Owner | Super Admin | Admin | Accountant | General User | Client |
|---|---|---|---|---|---|---|
| View invoices | All | All | All | All | No | No |
| Create invoices | Yes | Yes | Yes | Yes | No | No |
| Edit invoices | All | All | All | All | No | No |
| Edit line item account/tax | Yes | Yes | No | Yes | No | No |
| Finalise invoices | Yes | Yes | Yes | Yes | No | No |
| Send/Email PDF | Yes | Yes | Yes | Yes | No | No |
| Record payments | Yes | Yes | No | Yes | No | No |
| Manage recurring | Yes | Yes | No | Yes | No | No |
| Delete invoices | Yes | Yes | Yes | Yes | No | No |
| Import invoices | Yes | Yes | Yes | Yes | No | No |
| View own statements | — | — | — | — | No | Yes |
Key Notes
- Owner and Super Admin have full access to all invoice operations.
- Admin can manage invoices but cannot approve payments, manage recurring invoices, or change line item account/tax fields (these are set by the transaction template).
- Accountant has full access to financial features but cannot approve payments or manage account settings.
- General Users cannot view or manage invoices. They do not have access to financial documents.
- Clients cannot view individual invoices. They can only see outstanding statements for their own business via the Statements feature.
- Contractors have limited access focused on task management rather than financial documents.
- Invoices in a locked project cannot be created or modified.